Cash Bakery

Its actually my little kitchen that I experience all kinds of recipe that I come across. Its also the place where I make favourite food for my loved ones.

Homemade Kueh Pie Tee

An excellent party food affair that involves hands on by your guests. They are thin and crispy pastry tart shell filled with a spicy, sweet mixture of thinly sliced vegetables and prawns.

Bamukuchen

Baumkuchen is a kind of layered cake. It is a traditional dessert in many countries throughout Europe and is also a popular snack and dessert in Japan. The characteristic rings that appear when sliced resemble tree rings, and give the cake its German name, Baumkuchen, which literally translates to "tree cake".

Friday, 1 August 2014

Banchan ~ Fruit salad

Korean side dish

Do you realised the fun of eating Korean food is that there are many side dishes that they served before your main dish is here... I really love the idea of eating variety of small food... Last weekend I come across this dish which I am not sure what is it called, basically its a fruit salad but it taste really good and refreshing maybe because they used canned fruit which add the sweetness to the whole dish and I don't know why the crab stick is just right for the whole combination....So I was thinking of recreate them at home which is pretty simple and will be done in 5 min.

Direction
First of all you prepare all the ingredients in a bowl and then add mayonnaise and mix well and TA DA.... Its ready to be served!!!! Don't forget to serve it cold.

Ingredients
Cherry tomatoes
Sweet Corn (I didn't add this because its out of stock in my kitchen :) )
Crab Stick
Rambutan Stuffed with Pineapple Can (you can also choose the mixed fruit can)
and ETC...


Monday, 7 July 2014

上湯娃娃菜 ~ Braised Chinese Cabbage in Superior Broth

Baby Cabbage in Premium Stock

I get to know this dish in China and I am really loving it, so I am recreating it in my own kitchen. Frankly speaking I am not too sure about the English name, so I hope I dun get it too wrong :). 

Actually I want to add dried scallop too, but I found out that I don't have any in my kitchen so I replaced it with dried shrimp. 

Of cos if you do not have the time to do chicken stock, you can use those sell in package. 

Ingredients
300g Chinese Baby Cabbage (washed and cut into half)
250ml Chicken Stock
200ml water 
Ham (sliced in strips)
1 preserved egg (cut into small dices)
Few slices of ginger
2 cloves garlic (thinly sliced)
2tsp dried shrimp/dried scallop (soak in water for at least 1hr)
1-2tsp Goji 

Direction
1. Blanch the baby cabbage for 3-5 min. Take out and arrange in a bowl.
2. Heat wok with 1 tbsp of oil, sauté garlic and ginger until fragrant, add dried shrimp, preserved egg and ham and stir fried until fragrant. 
3. Add chicken stock and water and cook until boil. Add Goji and cook for awhile. Turn off the heat and pour over the bowl of cabbage.
4. Steam for 5-7 min and ready to be served.

Sunday, 6 July 2014

Danish Pastry ~ Duchess

Puff Pastry


This is my second blog on puff pastry. As you know I am quite happy with the frozen puff pastry I found @ the local supermarket (COLD STORAGE, Market Place and if you are lucky NTUC), so I tried out different type of Danish pastries. There is a wide range of fillings and toppings as well as shapes and sizes to choose from, which can make the preparation of these pastries almost as much fun as eating them!

In this blog I am showing on how to do Duchess Pastry. For written recipe, please refer to my blog on Mini Napoleon Strawberry with Lemon Curd.

As for other shapes like Windmill, you can look at the youtube below which is very well shown in anime form. 
http://www.youtube.com/watch?v=gvgYYUIc0kM

There are many other recipe you can used for puff pastry which is well archived in the company website Pepperidge Farm and the youtube videos as well (http://www.youtube.com/user/PFpuffpastry/videos). Do look at them if you are keen. 

And of cos this is the second time I am using drawing to illustrate my recipe and hope it can be easily understood. Do have fun on the berries decoration, maybe add some raspberry or blueberry or apple. Bon Appétit and have fun!!!

P.S. The lemon curd recipe shown below is for 1 packet of puff pastry. 


Friday, 4 July 2014

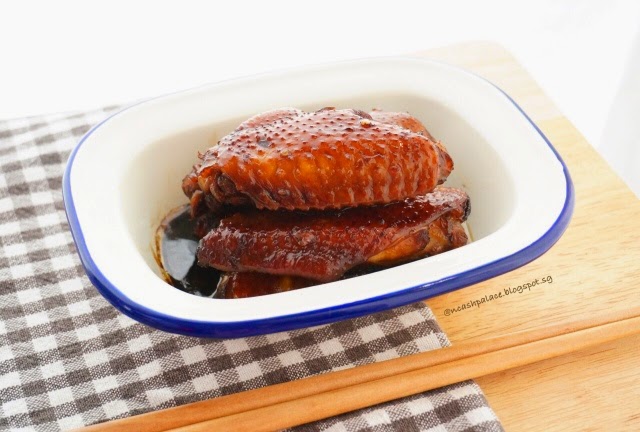
Swiss Chicken Wing (Cash's Version)


Soya Sauce Chicken Wing

Swiss Wing is the name given to a kind of sweet soy sauce-flavored chicken wings served in some restaurants in Hong Kong. It is marinated in sauce made up of soy sauce,sugar, Chinese wine, and spices. Despite the name "Swiss," it is unrelated to Switzerland. Instead, it is believed to have originated in either Hong Kong or Guangzhou. It was also claim that the dish was invented by a local Hong Kong restaurant, the Tai Ping Koon (太平館). 

Therefore whenever I am in Hong Kong I will visit the place for the famous Swiss Wing. Read More...
However its hard to find one in Singapore whenever you miss this dish, the only place I know serving authentic Swiss Wing in Singapore is the Central Hong Kong Cafe @ Vivo City/Star Vista.

So when I am lazy to go all the way to shopping centre, I made one on my own, of cos it my own short cut version but the taste is quite close and more local as I am using the following marinade sauce instead of the Hong Kong Swiss Chicken Sauce which I was unable to get one in Singapore.

Ok enought of the talking, its time for me to write down the recipe.

Ingredients
500g chicken wings/mid wings
1/2 pc lemon juice
1/2 tbsp sweet soya sauce

10g sliced ginger
2 shallots (lightly beaten)
3 garlic (lightly beaten)
2 bird eye chilli (optional)

1 tsp salt 
1 tbsp Mirin (I used mirin because it has sweet taste sake)

A.
20g rock sugar (add according to your taste)
1 tbsp oyster sauce
100 ml Tai Hua Chicken Marinade Sauce
150 ml water 

Directions
1. Wash chicken wings, mix with lemon juice and rinse with water. Blanch for 2-3 min, take out and mix with 1/2 tbsp of sweet dark soy sauce. 

2. MIx ingredients A.

3. Heat the wok with 1-2 tbsp oil. Sauté shallot, garlic, sliced ginger and chilli. Stir in 1/2 Ingredients A and shallow fry for a while and then add in chicken wing and cook for a while. Take out the chicken wing only and set aside.  

4.  Stir in remaining ingredients A, boil over high heat and then reduce to medium heat for 10 min. And then add in the chicken wing and cook over high heat and stir in Mirin and salt. Turn off heat and then cover for 10-15min. Ta... Da...:) Ready to serve.


Wednesday, 2 July 2014

Green Tea Matcha Macaron

This was the second attempt ... Look more like KeroKeropi already?

To do the KeroKeropi design:
1. Draw 2 cicrle using white chocolate and put in the fridge until set
2. Glue the eyes to the macaron shell using the leftover garnache
3. Draw the eyes with dark chocolate
4. And the cheek with pink royal icing.


First time writing recipe with drawing, hope it adds pleasure and fun in the baking operation. Is it easy to understand? Does it add a smile to your face? Do the little ones joining in the fun as well? Share with me :)

I have always find Macaron is a big challenge, therefore I did a lot of youtubing before I started and of cos I failed the first time but fortunately I succeeded the second time. There are quite a number of points to take note and this lady has explained really well in her youtube. Therefore I suggest that you watch it a few times before you start (http://www.youtube.com/watch?v=xJ636Y8N6E8).
And if you fail, check this Macaron Troubleshooting and hopefully you will succeed on your next try. 

Let me explain my recipe by drawing and I make some notes.

First, you need to make the Green Tea Garnache.

Second, you need to make the Macaron Shell.
Note:
1. It is really important to ensure that your almond powder is very fine and sifted twice, else you will have ugly shell that is not smooth and will break.
Tips: Break up your nuts in the food processor, add the powder sugar and give it a whir. Pass the mixture through a sifter and re-grind the bigger particles.  
2. It is important that your egg is at room temperature. You may want to separate the egg white one day in advance which is called ageing your egg white so it is easy to whip up, of cos this is optional if you are very confident in your meringue process. Read here for the detailed explannation. (http://foodnouveau.com/2011/12/destinations/europe/france/a-macaron-troubleshooting-guide-useful-tips-and-advice-to-master-the-french-delicacy/#general-03-shortcut-to-aging)
3. Folding the batter, you start from the edge, start folding onto the the centre to incorporate the powders to the egg whites. Keep doing this and flatten the batter slightly. Continue to work the batter until you get a ribbon when the batter drips off the spatula.
4. Once you have done piping out the macaron shell. Allow the macarons to dry for 20 to 30 minutes. If the macaron doesn't stick to your finger when you touch it you can move to the next step and put your macarons in a preheated oven. (I dry them at air condition room because of the humidity of our weather)


This wast the first failed design of KeroKeropi
The Meringue process:


And I store them in the fridge overnight. 


Sunday, 22 June 2014

Tahu Isi ~ Stuffed Tofu

                                 Stuffed Toufu

This is a traditional street food in Indonesia, crunchy on the outside and super moist on the inside, and tingly on the tongue if you eat it with chilli padi. 

It is actually kind of stuffed tofu and pretty easy to make for afternoon snack or party.

Basically you stir fried some vegetable such as carrots, long beans, cabbage, and etc or you may add some prawn or minced meat, and stuffed them inside a fried tofu which has been emptied inside or tau pok and finally cover with batter and deep fried until golden brown. And woolaaa... They are ready!!!

If you want some guideline, you can see the recipe below.

Ingredient (amount vary on the tofu size and the variance of vegetable you used)
Fried Toufu (slit on one side and scoop out the inner part to make a wallet to fill the stuffing)
~ I used Tao Pok for short cut so I don't need to dig out the tofu inside
~ you can choose to deep fried your own tofu using firmed tofu
Carrot, shredded
Bean Sprout 
Taoge
Long Beans, cut to 2 cm length
Cabbage, shredded
Prawn/Minced Meat (optional)

Spice Paste (this proportion is for approx. 12 tofu)
3 cloves small red onion
2 cloves garlic
1/2 tsp pepper
A pinch of salt
few bird eye chilli (optional)
~ grind/blend the spices into smooth paste and divide into 2/3 & 1/3

Batter (this proportion is for approx. 12 tofu)
1 cup Plain flour
2/3 cup Water (add more water if required to attain thin consistency)
1/3 of the spice paste above
1 egg

Directions
1. Heat 2 tbsp of oil and take 2/3 of spice paste and stir fry all the vegetable & meat until just about witted and add in 2 tbsp water and season to taste with sweet soy sauce, pepper and salt. Set aside to cool for stuffing.

2. Combine the flour, salt and 1/3 of spice paste in a bowl. Add water and stir until a thin consistency is attained. Add in egg and stir well. Set aside.

3. Using a small spoon and packed each tofu with the prepared stuffing. 

4. Heat oil in a deep fryer. Dip the tofu in batter until well coated and drop gently into the oil and fry until golden brown. 

5. Served immediately when its hot with bird eye chilli (if you dare) or on its own.


Stuffed Toufu

Friday, 6 June 2014

Turtle Melon Pan (Japanese Style Pineapple Bun)

Pineapple Bun

When I started this project, I thought of doing the Cantonese pineapple bun, so I Google about it and the more I Google, my plan changed. I decided to make the cute turtle melon pan that I always see at the Japanese bakery, who doesn't love cute snacks right?. After my intensive study, I realised they are actually the same kind of thing, only one is called pineapple bun and the other is called melon pan and both has nothing to do with the fruit pineapple and melon beside the shape. I understand in Hong Kong, some of those old cafe had lard in their pineapple bun recipe, but seems like its kind of difficult for me to get lard so I moved to healthier Japanese version.

In short:
 Melon Pan/Pineapple Bun = Bread  Dough + Cookie Dough. 

So, if you know both recipe or had your own preferred recipe, you got yourself a melon pan recipe in hand.
And to make a turtle one, you just need to shape the bread dough and assemble it, just like how this lady (Hippomum) has done it here at step no.5. If you are unable to understand Chinese, let me explain to you how to assemble in the highlighted steps below. She had also done a Totoro version here.

Here is the recipe:
Serves: 10
(depend on whether you are making baby turtle or mommy turtle, if you are first time making bread I suggest you can half the recipe as assembling turtle takes time)

Ingredients

Bread Dough
200g bread flour
5g instant yeast
35g caster sugar
100ml warm water (not too hot for hand)
20g  beaten egg, room temperature
1/2 tsp. salt
20g butter, room temperature

Cookie Dough

50g butter, room temperature
50g beaten egg, room temperature
70g sugar
160g cake flour
1/2 tsp baking powder
1/2 tsp of pandan flavouring/green food colouring (optional if you want a green turtle)

Direction

1. First, you need to make the cookie dough as it require time to set in the fridge.
2. In a stand mixer (optional), whisk the butter for awhile. Add sugar and continue to whisk until pale and creamy, approx 3 min. Add egg little by little and mix well. (Optional) Add the pandan flavouring/green food colouring and mix well.
3. Shift in cake flour and baking powder and mix well until everything comes together into a dough. 
4. Cover with plastic wrap and shape it into a log and refrigerate until firm, at least 1 hour.

5. Next, we can make the bread dough. Mix warm water, salt and beaten egg together.
6. In a stand mixer with dough-hook attachment, first mix together bread flour, instant yeast and sugar until even. (Kneading with hand will take at least 20 min)
7. Gradually mix in the warm water mixture and turn the speed to medium, and knead the dough until it's silky and elastic, appprox 5 min (the dough may seem slightly dry at first but should come together at the end, if not add 1 tsp more water).
8. Then add the softened butter in 3 additions. Only add the next addition when the previous one has been evenly kneaded into the dough for at least 7-8 min. The dough should be soft and moist, but pulls away cleanly from the bowl when the machine run and makes slapping sound against the side.
9. In a large bowl, form the dough into a ball and cover the bowl with plastic wrap (to keep the surface of the dough from drying out), and leave to proof in a warm place at 30C for 30-60 min or until it has doubled or tripled in size.
(You can use the proof function on your home oven by first preheat the 
oven to the lowest setting 30C/40C then turn it off 15 minutes before you put in the bowl of dough. Place 2 cups of recently boiled hot water into the oven, next to the dough to ensure the bread dough is not dry up. Ensure the oven door is closed during the whole proofing process.)

10. Once proofed, coat your finger in flour and poke the dough. If the hole stays, it's ready. If the dough springs back, it needs to proof more. If the dough shrinks, it is over proofed. 

11. Finally, assemble the melon pan, in a turtle shape if you want. I learn this from this blogger hippomum.

12. Place the dough onto a working surface and punch out the air with your palm. Divide it into 10 equal pieces using a knife. 
To make turtle shape:
For each piece, cut out 4g (head), 6g (divide into 4 legs and one tail) and the rest for body. Quickly form them into balls. Place them on a baking sheet, cover with plastic wrap and rest for 15 minutes.
13. Take out the cookie dough and cut them into 10 pieces and shape them into balls. One at a time, roll out the cookie dough between two layers of plastic wrap, place the turtle body in the center and enclose it in the cookie dough. With a scraper or knife, cut the criss-cross pattern on the cookie dough. Finally glue the head, legs and tail onto the body (use a bit of water if necessary). 

Optional: You can sprinkle some sugar on the cookie dough for better flavour.

(The pastry crust softens very easily, so work with only 1 or 2 portions at a time, keeping the remaining pastry crust refrigerated.)

14. Place them on lined baking sheet and  cover with plastic wrap and leave to proof in a warm place at 30C for 20-30 min. (you can use the proof function on your home oven as above)

15. Bake at 180C for 10-12 minutes. (Depending on the heat of the oven, cooking time may differ). P
lace them on a wire rack to cool. Ready!!!

Enjoy the fun baking process!!! Its ok to fail, bread is always hard to make, you need lots of failure to be successful, or maybe you are baking genius.

I still want to study more on how to make bread extremely moist in the mouth, if you can teach me, please do share it on my facebook page. 

Sharing some illustration of my turtle toy and my turtle melon pan. 


Twitter Facebook Favorites More